Batch Conversion of 3D Data to DICOM-SEG Using 3D Slicer
Segmentation is the identification of anatomic structures and pathology within medical images. It serves as the essential first step in numerous clinical applications, including diagnosis, treatment planning, quantitative analysis of imaging for research, and radiotherapy planning. Image segmentation has historically been a manual, time-intensive workflow requiring significant expertise, which has hindered the adoption of many promising advanced technologies. In recent years the advent of Artificial Intelligence (AI) segmentation has become faster and more efficient enabling the broader use of personalized and precision medical technologies.
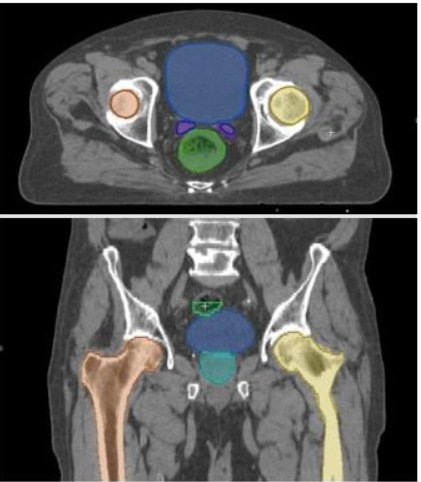
While segmentation is central to a wide array of applications, the type of output it produces must often be customized for its intended use. As an example of this challenge, consider preoperative planning, a process where surgeons use digital tools (including 3D models and imaging data), to visualize anatomy, assess potential risks, and make critical decisions about a procedure before it is performed. Planning applications rely on tessellated 3D models (often stored as STL files created from segmentation data) for simulation, visualization, and analysis. These models are ideal for creating 3D printed patient-specific instrumentation and for robotic assisted intervention, but cannot be used directly for developing or adapting the AI models used for segmentation. AI model training requires a different type of output called an "image mask" which encodes segmentation data as a binary representation where each pixel is classified as part of a structure of interest or not.
Tessellated models are a network of vertices, edges, and triangular faces. They provide a geometric depiction of anatomy and can be used in 3D printing or robotic applications. However, these models are unsuitable for AI training, which requires segmentation data in the form of image masks.
Fortunately, open source tools such as 3D Slicer enable conversion between formats, allowing for data to be stored in one format (such as STL files) and converted to another (such as DICOM-SEG image masks) as needed. This can even be done in an automated and headless fashion. In this article we'll look at a four-step process which can be used to batch convert data stored in a Sonador medical database (Orthanc) using Slicer so the data can be used to fine-tune a segmentation model.
First, we'll look at a strategy for bulk-retrieving data from Orthanc and synchronizing with the local Slicer database (allowing for local processing provides a way to manage state for the batch and a mechanism to re-process failed cases without synchronizing with the cloud). Next, we'll look at how to implement conversion of M3D data to image masks (step 2) which we'll persist to DICOM-SEG (step 3). Finally, we'll show how to send the data back to Sonador using the IO extension for Slicer (step 4).
This tutorial builds on a previous guide which shows how to use 3D Slicer as a headless batch processing tool on Windows. The code below is intended to be executed using the PowerScript launcher Slicer-App.ps1 if working on Windows or from BASH if on Linux or Mac. The Python scripts below build on the application and logging patterns discussed in the earlier article.

Workflow
We will implement the workflow using two automated scripts followed by manual upload of the DICOM-SEG files:
- The first script (which corresponds to step 1 of the workflow) retrieves the imaging from the medical database. It queries Sonador/Orthanc to locate tessellated models (STL files) and the related medical imaging and imports both to the Slicer local database for processing. Both models and imaging are needed since the models contain the geometry and the medical imaging contains the coordinate system and spatial dimensions of the scan. Since there may be hundreds of patient studies in a batch, data is imported to the Slicer local database. Making the data available locally allows cases to be re-processed and inspected should an error occur without needing to re-transfer.
- The second script creates the binary masks. Once data is available locally, the STL files and medical imaging volume can be loaded, the intersection of the tesselated models with the images determined, and binary mask generated.
- The second script also manages export of the image masks to DICOM-SEG (corresponding to step 3 of the workflow) and adds them to the local Slicer database. After creating a MRML segmentation node, the mask is associated with its source imaging series, the attributes and identifiers of the DICOM sources exported to a DICOM-SEG file (which helps to maintain the lineage of the segmentation), and imported to the local database.
- The final step of the workflow , transferring the DICOM-SEG data to the Sonador medical database, is executed manually (though it could also be automated). Once all processing is complete, Slicer can be launched, the DICOM database opened, the newly created DICOM-SEG series selected, and the Slicer IO extension used to transfer the data to Orthanc.
Architecture and Components
The worfklow builds upon the Sonador Medical Data Platform:
Orthanc: Medical Database and Imaging Archive
Orthanc provides a medical database capable of storing large amounts of DICOM encoded data. It is the repository used by the workflow for retrieving medical imaging and M3D/STL files. The first step fetches batches of information from Orthanc and imports it to Slicer's local database for processing.
Sonador: Imaging Integration
Sonador facilitates access to Orthanc and other elements of the platform. It is responsible for managing users and roles, credentials, permissions, and secure access to data.
3D Slicer: Batch Automation
3D Slicer is a desktop platform which enables batch processing of M3D and medical data. It provides a Python API, local database, and headless command line tool which can be used to launch custom scripts.
Sonador IO Extension for Slicer
The Sonador IO Extension for Slicer integrates Sonador into 3D Slicer. It provides an interface to manage connection credentials, import DICOM data into Slicer's local database, and DICOM plugins for reading M3D series to model MRML nodes.
System Requirements and Prerequisites
- Access to a development or production instance of Sonador and Orthanc.
- Version 3.7 or newer of 3D Slicer with the Quantitative Reporting and Slicer Development Toolbox plugins installed.
- Sonador IO Extension for Slicer installed and configured to connect to your Sonador instance.
- The UID of the Orthanc instance to be used defined as the
SONADOR_IMAGING_SERVERenvironment variable.
Script 1: Retrieve Imaging
The first of the processing scripts manages the retrieval of data from Sonador and its import into the Slicer local database. It provides the foundation for the second script by ensuring that all data is available locally. While not implemented in this example, it is a good idea to also include data validation as part of the transfer to ensure that the medical imaging series are complete and intact prior to processing them.
The script retrieves tessellated models (M3D series) and associated medical imaging from a Sonador server; processes each study and series by downloading the binary data; and indexes the retrieved files in Slicer’s local database. It includes a try / catch / finally structure to handle errors in a systematic way, a modular structure, and uses Sonador's high-level "tasks" to manage data transfers.
Dependencies
Script 1 relies on a number of dependencies from the
Sonador IO client (sonador),
Sonador QT (sonadorqt), and the
Sonador IO extension (sonador_ext).
These include:
- Sonador string constants, defined in
sonador.apisettingssuch asSONADOR_IMAGING_SERVERandDCM_MODALITY_M3D, which are used to retrieve connection parameters and to construct query filters. - Sonador tasks, imported from the
sonador.tasksmodule (tasks are high-level operations) such asdownload_imaging_filearchiveandstream_imaging_series, which provide parallelized transfer with retry and hooks for error handling. Tasks are designed to work within processing scripts, CLI tools, and orchestration systems like Airflow and encourage code re-use between the various runtimes supported by Sonador.
#* Script 1, Part 1: Dependencies *#
import sys, os, slicer, logging, sonador, traceback, ctk, urllib3, tempfile, zipfile

# Sonador libraries for retrieving connection credentials and to configure logging
from sonador.apisettings import SONADOR_IMAGING_SERVER, DCMHEADER_SERIES_INSTANCE_UID, \
    DCMHEADER_MODALITY, DCM_MODALITY_M3D

# Sonador "tasks" for downloading data. download_imaging_filearchive retrieves a
# zip archive while stream_imaging_series downloads the DICOM files one by one.
# Streaming may be necessary for very large CT series that may have hundreds or
# thousands of slices.
from sonador.tasks.images import download_imaging_filearchive, stream_imaging_series

# Sonador UI and Slicer Script helpers: fetch_sonador_credentials and fetch_sonador_connection
# retrieve the connection
from sonadorqt.base import fetch_sonador_credentials, fetch_sonador_connection
Logging
To ensure that the script is easy to monitor and debug, logging is configured
using the configure_script_logging helper function from the Sonador IO extension. This helper
method unifies log output from Slicer's internal C++ code, third-party libraries,
and other Python scripted components.
#* Script 1, Part 2: Logging *#
from sonador_ext.scripts import configure_script_logging

# Disable SSL validation warnings
urllib3.disable_warnings()

# Configure logging to stdout
configure_script_logging(level='info')
logger = logging.getLogger(__name__)
If desired, logging can be directed to multiple outputs including other log streams or files through the use of additional "handlers." Refer to "Unlock the Potential of 3D Slicer on Windows: Batch Processing Imaging Data with Sonador" for details.
Script Structure, Code Flow, and Exception Handling
The script uses a try / except / finally structure to manage operations and error flow.
- The
tryblock contains the primary logic for querying and downloading data and is intended to contain all of the operations needed for a "successful" run. - The
exceptblock is intended to catch and log exceptions (including stack traces) to help facilitate troubleshooting. If needed, it might also contain cleanup code to identify and remove DICOM data that is incomplete or malformed. This example does not include data validation or cleanup logic. - The
finallyblock ensures that the script terminates cleanly by explicitly callingexit(). This step is critical to prevent Slicer from hanging after the script completes.
#* Script 1, Part 3: Structure *#

# Create exit code
exit_code = 0

try:
    # Main script logic: query Sonador for M3D series, download to temp folder, index/import to Slicer
    # ... #

except Exception as err:

    # Set exit code to non-zero value to indicate that the script encounter an error
    exit_code = 1

    # Log any exceptions along with a traceback
    logger.error('Unable to complete batch processing because of an error. Error: "%s"\n%s' % (
        err, traceback.format_exc(),
    ))


finally:

    # Explicitly exit the application after all data has been processed. The Slicer
    # process will hang without an explicit exit, which is undesirable for batch scripts.
    exit(exit_code)
Retrieve Data from Sonador
Retrieving data from Sonador involves five steps:
- Step 1: Fetch the Sonador "server" connection using the
fetch_sonador_connectionhelper from thesonadorqtpackage.fetch_sonador_connectionretrieves the connection parameters configured when the Sonador IO extension was installed.fetch_sonador_connectionreturns aSonadorServerinstance. - Step 2: Retrieve the "imaging server" (Orthanc) instance to query for the M3D data.
The imaging server instance is fetched by using the
get_imageservermethod of theSonadorServer.get_imageservertakes the the Sonador unique ID (UID) of the Orthanc instance. While there are a variety of ways to provide this parameter, this script pulls the UID from an environment variable (SONADOR_IMAGING_SERVER). If there isn't a UID defined, aValueErroris raised. If the UID is invalid,get_imageserverwill raise an error. - Step 3: Create and execute a study query for resources which have an M3D instance associated with them.
This script is designed to retrieve all matching studies on every run, a strategy which will
not work well with Orthanc instances that have large numbers of matching studies.
query_studyacceptsitemsandoffsetparameters which can used to implement pagination or a batch numbering system. - Step 4: Iterate through results, download files, and stage for indexing. For each study and series
in the query results, the script attempts to download a zip archive to a temporary directory
using the
download_imaging_filearchivetask from thesonador.tasksmodule. If download fails because of aBadZipFileerror (which may happen for large imaging series), the script falls back to streaming indiviudal files using thestream_imaging_seriestask. Streaming is more robust when dealing with large datasets, but is less efficient. - Step 5: Index DICOM files to the Slicer local database. Once all files have been downloaded, the script uses
Slicer's
ctkDICOMIndexerclass to import the data into the local database. This step ensures that the retrieved data is available for further processing.
#* Script 1, Part 4: Retrieve Data from Sonador *#

# Retrieve image server UID from an environment variable. Slicer allows for users
# to select which image server they want to work with from the UI, which does
# not work when running the script headless.
iserver_uid = os.environ.get(SONADOR_IMAGING_SERVER)
if not iserver_uid:
    raise ValueError("Invalid image server UID. Check value of ENV variable %s" % SONADOR_IMAGING_SERVER)

# Retrieve Sonador credentials
iserver = fetch_sonador_connection().get_imageserver(iserver_uid)
results = iserver.query_study({ DCMHEADER_MODALITY: DCM_MODALITY_M3D })
logger.info('Sonador="%s" Orthanc="%s". M3D Studies: %s' % (
    iserver.server.url, iserver.server_label, len(results)
))

for s in results:
    logger.info('Retrieve data for study=%s study-description="%s"' % (s.pk, s.description))
    for sx in s.series_collection:
        logger.info(' * series=%s series-description="%s"' % (sx.pk, sx.description))

        # Check local database and import data if the series is not already present
        slicer_dcm_idx = slicer.dicomDatabase.instancesForSeries(sx.series_uid)
        if not slicer_dcm_idx:
            with tempfile.TemporaryDirectory() as tmp:

                # Attempt to download zip archive of the data
                try: download_imaging_filearchive(sx, tmp, extract=True)

                # If a zip archive of the data can't be downloaded, download each file in the
                # series individually
                except zipfile.BadZipFile as err:
                    _path = os.path.join(tmp, sx.pk)
                    os.mkdir(_path)
                    stream_imaging_series(sx, _path)

                # Initialize indexer instance to import the data into the Slicer database
                indexer = ctk.ctkDICOMIndexer()
                indexer.addDirectory(slicer.dicomDatabase, tmp, True)   # Index from file copy
                indexer.waitForImportFinished()
                logger.info("   - Series imported successfully, PK=%s, Modality=%s" % (
                    sx.pk, sx.modality
                ))

        elif slicer_dcm_idx:
            logger.warning("   - sx already present in database: %s, PK=%s, Modality=%s" % (
                slicer_dcm_idx, sx.pk, sx.modality
            ))

        else:
            raise ValueError("Unable to determine state of series %s, PK=%s, Modality=%s" % (
                    slicer_dcm_idx, sx.pk, sx.modality
                ))
Note: To improve the efficiency of the data import, the script checks the local database to
determine if a series has already been imported by calling the
slicer.dicomDatabase.instancesForSeries method. If a set of DICOM indexes are found,
import of that series is skipped. This allows for the script to be restarted should
it fail during execution.
Running Script 1
The listing below contains the complete logic for Script 1. Save the contents
to a text file called fetch-m3d-data.py on the system where Slicer is installed.
import sys, os, slicer, logging, sonador, traceback, ctk, urllib3, tempfile, zipfile

# Disable SSL validation warnings
urllib3.disable_warnings()

# Sonador libraries for retrieving connection credentials and to configure logging
from sonador.apisettings import SONADOR_IMAGING_SERVER, DCMHEADER_SERIES_INSTANCE_UID, \
    DCMHEADER_MODALITY, DCM_MODALITY_M3D

# Sonador "tasks" for downloading data. download_imaging_filearchive retrieves a
# zip archive while stream_imaging_series downloads the DICOM files one by one.
# Streaming may be necessary for very large CT series that may have hundreds or
# thousands of slices.
from sonador.tasks.images import download_imaging_filearchive, stream_imaging_series

# Sonador UI and Slicer Script helpers: fetch_sonador_credentials and fetch_sonador_connection
# retrieve the connection
from sonadorqt.base import fetch_sonador_credentials, fetch_sonador_connection
from sonador_ext.scripts import configure_script_logging

# Configure logging to stdout
configure_script_logging(level='info')
logger = logging.getLogger(__name__)

# Exit code
exit_code = 0


try:

    # Retrieve image server UID from an environment variable. Slicer allows for users
    # to select which image server they want to work with from the UI, which does
    # not work when running the script headless.
    iserver_uid = os.environ.get(SONADOR_IMAGING_SERVER)
    if not iserver_uid:
        raise ValueError("Invalid image server UID. Check value of ENV variable %s" % SONADOR_IMAGING_SERVER)

    # Retrieve Sonador credentials
    iserver = fetch_sonador_connection().get_imageserver(iserver_uid)
    results = iserver.query_study({ DCMHEADER_MODALITY: DCM_MODALITY_M3D })
    logger.info('Sonador="%s" Orthanc="%s". M3D Studies: %s' % (
        iserver.server.url, iserver.server_label, len(results)
    ))

    for s in results:
        logger.info('Retrieve data for study=%s study-description="%s"' % (s.pk, s.description))
        for sx in s.series_collection:
            logger.info(' * series=%s series-description="%s"' % (sx.pk, sx.description))

            # Check local database and import data if the series is not already present
            slicer_dcm_idx = slicer.dicomDatabase.instancesForSeries(sx.series_uid)
            if not slicer_dcm_idx:
                with tempfile.TemporaryDirectory() as tmp:

                    # Attempt to download zip archive of the data
                    try: download_imaging_filearchive(sx, tmp, extract=True)

                    # If a zip archive of the data can't be downloaded, download each file in the
                    # series individually
                    except zipfile.BadZipFile as err:
                        _path = os.path.join(tmp, sx.pk)
                        os.mkdir(_path)
                        stream_imaging_series(sx, _path)

                    # Initialize indexer instance to import the data into the Slicer database
                    indexer = ctk.ctkDICOMIndexer()
                    indexer.addDirectory(slicer.dicomDatabase, tmp, True)   # Index from file copy
                    indexer.waitForImportFinished()
                    logger.info("   - Series imported successfully, PK=%s, Modality=%s" % (
                        sx.pk, sx.modality
                    ))

            elif slicer_dcm_idx:
                logger.warning("   - sx already present in database: %s, PK=%s, Modality=%s" % (
                    slicer_dcm_idx, sx.pk, sx.modality
                ))

            else:
                raise ValueError("Unable to determine state of series %s, PK=%s, Modality=%s" % (
                        slicer_dcm_idx, sx.pk, sx.modality
                    ))


except Exception as err:
    exit_code = 1

    # Log any exceptions along with a traceback
    logger.error('Unable to complete batch processing because of an error. Error: "%s"\n%s' % (
        err, traceback.format_exc(),
    ))


finally:

    # Explicitly exit the application after all data has been processed. The Slicer
    # process will hang without an explicit exit, which is undesirable for batch scripts.
    exit(exit_code)
The script can be run by calling the Slicer CLI tool and providing the path
using the --python-script option (if on Linux or Mac and using BASH, the executable will be slicer;
on Windows, use Slicer-App.ps1).
# Change Slicer-App.ps1 to slicer if running on Linux or Mac OS X
Slicer-App.ps1 --no-main-window --python-script /path/to/fetch-m3d-data.py
For the script to execute with the command above, you will need to have slicer (on Linux/Mac) or Slicer-App.ps1 (Windows) available in the PATH for your environment. You will also need to provide the Orthanc UID of the server as an environment variable. Refer to "Unlock the Potential of 3D Slicer on Windows: Batch Processing Imaging Data with Sonador" for additional detail.
The --no-main-window option is used here to prevent Slicer from opening an application window. Refer to slicer --help to see other runtime options.
Script 2: Convert M3D Models to Segmentation Layers
The second processing script loads the M3D (STL) series and source imaging data from the local Slicer database, creates binary masks by calculating the intersection of the geometry with each slice of the image stack, sets the "reference volume" for the segmentation layer so it preserves the correct patient coordinate system, and exports the result to DICOM-SEG.
Script Architecture
Script 2 is similar to Script 1 in many ways:
- It has the same general architecture and ordering with dependency imports, log configuration,
try/except/finallycode flow, and exception handling. - It uses dependencies from
sonador,sonadorqt, andsonador_ext. - Iteration proceeds along the "DICOM model of the real world" where all patients with M3D instances are retrieved from the database
It also has many important differences:
- Processing in Script 1 uses Sonador as the primary source of data and relies upon the Sonador IO client library. The Sonador IO client is designed around "object relational mapper" (ORM) principles and provides "fat models" for working with data. As a result, model instances include data properties and methods defined within a single object and processing scripts work directly with Sonador model instances. Data processing in Script 2 uses Slicer's imaging database, which provides a lower-level interface and requires that data properties be retrieved using DICOM codes (in much the same way you would interact with a database using an SQL cursor). This means that Script 2 interacts much more closely with methods defined directly on the database and the database becomes an important input to helper methods. The database is available from the
dicomDatabaseproperty of theslicermodule (slicer.dicomDatabase). - Data within Script 2 is represented by VTK objects. As compared to Sonador IO client models, VTK objects have a larger memory footprint and require more explicit care for their lifecycle. For this reason, the script includes explicit nullification of variables and garbage collection after each study has been processed.
- Script 2 relies heavily upon Slicer's "DICOM plugins" to load data from files into Slicer's 3D MRML Scene (which represents the 3D reconstruction of the patient's anatomic data). Within the script, these components usually have a
*_loadervariable name and are passed as inputs to data processing functions. For the script to execute successfully, the plugins must be enabled and present. If you run into issues executing the script logic, refer to the list of required plugins under the "System Requirements and Prerequisites" section of this article.
The Script 2 code is split between two components:
create_dcmsegdata processing method: responsible for creating DICOM-SEG files on a per-study basis. It retrieves all study data from the DICOM database to the MRML scene (through the use of Slicer DICOM plugins), creates a new segmentation node (which will become the DICOM-SEG file), converts the models to binary masks, exports the data to DICOM-SEG, and then cleans up the scene before processing the next patient.- Main processing loop: iterates across patients, studies, and series from the Slicer local database; determines which have already been processed (determined by whether a
SEGseries is present in the study) and invokes thecreate_dcmsegmethod (if needed).
In the rest of this section, we will look at these two components in more detail.
Discussion of features shared with Script 1 have been omitted. Please refer to the corresponding sections of Script 1 for comments on dependencies, logging, and code flow. For the complete source of Script 2, refer to the "Running Script 2" section below.
create_dcmseg
The create_dcmseg method is the main data processing routine of Script 2.
It takes a PatientID and StudyInstanceUID (both passed as strings) as inputs
and manages the loading of M3D model data as
MRML nodes,
the creation of binary masks, setting the reference volume, and export of the DICOM-SEG data
to the Slicer database.
#* Script 2, Part 1: create_dcmseg method definition *#


def create_dcmseg(p, s,
    m3d_loader=None, vol_loader=None, seg_logic=None, seg_exporter=None, db=None):
    ''' Create a DICOM-SEG object from all M3D data within the provided study.

        @input p (str): PatientID for the patient being processed..
        @input s (str): StudyInstanceUID for the study being processed.

        Slicer program components required for export. If not provided as part
        of the method call, then retrieved and initialized form the Slicer modules.

        @input m3d_loader (DICOM loader instance): M3D DICOM plugin instance
            to be used for loading M3D data into the MRML scene.
        @input vol_loader (DICOM loader instance): DICOM plugin instance
            to be used for loading DICOM volume data into the MRML scene.
        @input seg_logic (DICOM SEG plugin instance): DICOM-SEG plugin instance
        @input seg_exporter (DICOM-SEG plugin exporter instance): DICOM-SEG exporter
            instance to be used for exporting segmentation data.
    '''
    # ... #
While the method's only required parameters are the patient UID and study instance UID,
it relies heavily on a number of DICOM plugins that are provided as "optional" parameters.
This is done in order to simplify the use of the method while minimizing the intialization of
un-needed plugin instances. If no plugin instance is passed (the default value for
the keyword arguments is None) a new instance will be created.
#* Script 2, Part 2: Initialization of DICOMPlugins (if not provided) witin create_dcmseg *#
# ... #

# Components required for seg export, if not provided as part of the method call
# then retrieve and initialize from the slicer modules.
m3d_loader = m3d_loader or slicer.modules.dicomPlugins['DICOMSonador3DPlugin']()
vol_loader = vol_loader or slicer.modules.dicomPlugins['DICOMScalarVolumePlugin']()
seg_logic = seg_logic or slicer.modules.segmentations.logic()
seg_exporter = seg_exporter or slicer.modules.dicomPlugins['DICOMSegmentationPlugin']()
db = db or slicer.dicomDatabase

# ... #
Slicer DICOM Plugins
Script 2 utilizes three Slicer plugins and a "logic" instance for loading data and executing the script logic:
DICOMSonador3DPlugin: responsible for loading STL files into the MRML scene (provided by the Sonador IO Extension)DICOMScalarVolumePlugin: handles the loading of DICOM image stacks and initializing the source volume that will provide the coordinate system for the DICOM-SEG file- Segmentation logic: converts model outlines into binary mask images for the
segmentation layers (available from
slicer.modules.segmentations) DICOMSegmentationPlugin: exports the generated segmentation mask to a DICOM-SEG file and adds it to the local Slicer database
Slicer DICOM plugin instances are initialized from the slicer.modules.dicomPlugins dictionary
(refer to the previous code listing) and provide a uniform interface for working with data:
plugin.examineFiles(files)is used to inspect files from the DICOM database and return an iterable of "loadables" that can be loaded to the MRML scene. Loadables are objects which contain DICOM properties and data to be converted to MRML node instances.plugin.load(loadable)parses the DICOM attributes of the loadable instance and initializes a node within the scene.
#* Script 2, Part 3: Example Slicer DICOM Plugin Use *#

# Example of DICOM plugin use: the "sx" variable in this example is a
# series instance UID
for loadable in dcm_plugin.examineFiles(db.filesForSeries(sx)):
    dcm_plugin.load(loadable)
Loading M3D Models
Loading of M3D (STL) data happens by iterating over M3D series in the study,
inspecting their files to locate STL model instances
(using the DICOMSonador3DPlugin.examineFiles),
and loading the models to the MRML scene using DICOMSonador3DPlugin.load.
STL files loaded to the scene using the DICOMSonador3DPlugin preserve their
color and other display attributes.
Iterate through series UIDs that are part of the study.
Series instance UIDs are retrieved from the database using the db.seriesForStudy(study_uid).
study_uid is the DICOM UID for the study for which you wish to retrieve the series
instance UIDs. It is passed to create_dcmseg as s.
Retrieve DICOM instance tag values.
To determine if a series includes STL files, the modality of the series is retrieved
from the tags of the first DICOM instance. DICOM instance tags are accessed from the
local Slicer database using the db.instanceValue method.
instanceValue takes the DICOM instance UID and the DICOM hexadecimal code.
The hex code must be passed as a comma separated string with the group as the first
element and the value as the second, example: 0010,0020.
The sonador.apisettings module within the Sonador IO client includes a large number
of hexadecimal codes which can be imported and used with Sonador, pydicom, and Slicer.
DCMCODE_* constants from sonador.apisettings are tuples with the hex prefix as the
first member and the hex value as the second. For this reason, to use DCMCODE_* variables
within slicer, it's necessary to join them using a comma.
Example: ','.join(DCMCODE_PATIENT_ID).
#* Script 2, Part 4: Retrieve DICOM Tags from Slicer Local Database *#

# DICOM codes imported from sonador.apisettings. DCMCODE variables within
# Sonador are encoded as a tuple with the DICOM hex prefix and hex value
# as the first and second members.
from sonador.apisettings import DCMCODE_PATIENT_ID, DCMCODE_MODALITY

# Retrieve the instance UID for the first DICOM instance in the series
dcm0 = db.instanceForSeries(sx)[0]

# Retrieve the patient ID and modality tag values. Because
patient_id = db.instanceValue(dcm0, ','.join(DCMCODE_PATIENT_ID))
modality = db.instanceValue(dcm0, ','.join(DCMCODE_MODALITY))
Load M3D instances and reference volume. The code in the listing below
shows how create_dcmseg loads M3D instances along with their reference volumes.
To prevent the data from other modalities from being loaded, the code
checks the modality of the series (retrieved from the DICOM instance tags).
The referenced volumes are determined by reading the referencedSeriesUID
property of M3D loadable instances. If the M3D instance does not reference
a source volume, this property will be null.
#* Script 2, Part 5: Iterate through series in a study and retrieve M3D instances *#
# ... #

# Retrieve series instance UIDs for the study
for sx in db.seriesForStudy(s):

    # Retrieve the details of the first instance (dcm0) and fetch the patient ID,
    # modality, and series description from the instance tags.
    dcm0 = db.instancesForSeries(sx)[0]
    patient_id = db.instanceValue(dcm0, ','.join(DCMCODE_PATIENT_ID))
    modality = db.instanceValue(dcm0, ','.join(DCMCODE_MODALITY))
    sx_description = db.instanceValue(dcm0, ','.join(DCMCODE_SERIES_DESCRIPTION))
    logger.info(f' - Patient {patient_id}, Series {sx}, Modality {modality}. Description: "{sx_description}"')

    # Load M3D models and images to scene
    if modality == DCM_MODALITY_M3D:
        for m3d_loadable in m3d_loader.examineFiles(db.filesForSeries(sx)):

            # Load M3D
            m3d_loader.load(m3d_loadable)

            # Load referenced volume
            for vol_loadable in vol_loader.examineFiles(db.filesForSeries(m3d_loadable.referencedSeriesUID)):
                vol_loader.load(vol_loadable)

# ... #
Create Binary Masks
Once all STL data has been loaded to the scene, create_dcmseg creates a segmentation
node (vtkMRMLSegmentationNode), sets the reference volume for the newly created node,
and uses a slicer.segmentations.logic
instance to convert the models to masks and add them as "layers" to the segmentation.
Create new segmentation node.
New nodes can be created within the Slicer scene (available via mrmlScene attribute
of the slicer package) by calling the AddNewNodeByClass method and passing the
class name of the node type you would like to create. Segmentation nodes are instances
of vtkMRMLSegmentationNode.
#* Script 2, Part 6: Create new segmentation node *#
# ... #

# Create segmentation node
segmentation_node = slicer.mrmlScene.AddNewNodeByClass('vtkMRMLSegmentationNode')
segmentation_node.SetName("Segmentation Mask")
segmentation = segmentation_node.GetSegmentation()

# ... #
MRML nodes are VTK objects and inherit from a common class. Because of this,
they provide a consistent C++ like interface for accessing and modifying properties.
Property values, such as the object name, can be retrieved using "getter" functions
and assigned using "setters." Getter functions typically have the form GetProperty
(with Property being the name of the attribute) while setter functions have the
general form SetProperty. Setter functions typically take the new attribute
value as their first argument. Getter functions normally do not require arguments.
The code in the listing above shows how to update the segmentation node's name
using the node.SetName("Name") method and how the "segmentation" can be retrieved
using node.GetSegmentation().
Set reference volume.
The reference volume is set by calling the
segmentation_node.SetReferenceImageGeometryParameterFromVolumeNode method and
providing a reference to the vtkMRMLScalarVolumeNode instance of the parent
(loaded in the previous step). The code in the listing shows how this is done
within create_dcmseg.
#* Script 2, Part 7: Set reference volume *#
# ... #

# Set reference volume for the segmentation
for i in range(slicer.mrmlScene.GetNumberOfNodesByClass("vtkMRMLScalarVolumeNode")):
    vol_node = slicer.mrmlScene.GetNthNodeByClass(i, "vtkMRMLScalarVolumeNode")
    _img_data = vol_node.GetImageData()

    # Ensure multi-slice volume in all dimensions
    if _img_data and all(_dim > 1 for _dim in _img_data.GetDimensions()):
        segmentation_node.SetReferenceImageGeometryParameterFromVolumeNode(vol_node)
        ref_vol_node = vol_node
# ... #
Comment 1: When interacting with the MRML scene, it is important to take care with how
node references are retrieved and assigned to Python variables. One Python safe
way to do that is by using the GetNthNodeByClass method of the slicer.mrmlScene.
GetNthNodeByClass requires the index position and node class name as inputs
and returns a memory-safe reference that can be successfully garbage
collected. The logic in the code above fetches the index position
by through the entire range of nodes. It determines how many nodes are
available by calling mrmlScene.GetNumberOfNodesByClass.
Comment 2: Because it may be possible for multiple scalar volume nodes to
exist in the scene (not all of which will have valid dimensions), the logic
in create_dcmseg includes a check to ensure that the reference
volume has a valid structure before attempting to assign
it as the reference geometry for the segmentation.
Create segmentation mask. Once the segmentation node has been created
and the reference volume loaded, the model nodes can be converted to
segmentation layers (also referred to as "segments") using the
ImportModelToSegmentationNode method of the segmentation logic (seg_logic).
#* Script 2, Part 8: Create segmentation masks *#
# ... #

# Iterate through model nodes
for i in range(slicer.mrmlScene.GetNumberOfNodesByClass("vtkMRMLModelNode")):

    # Retrieve model node
    model_node = slicer.mrmlScene.GetNthNodeByClass(i, "vtkMRMLModelNode")

    # Add model to segmentation as mask: the segmentation module is used because
    # of the internal complexity of mapping non-overlappying sections. Refer to:
    # https://discourse.slicer.org/t/segmenteditor-consuming-tons-of-memory-3d-slicer-crashes/19014/5.
    # GetNthSegment is used for retrieving the segment reference to prevent dangling pointer
    # errors which might lead to memory leaks.
    _success = seg_logic.ImportModelToSegmentationNode(model_node, segmentation_node)
    segment = segmentation.GetNthSegment(segmentation.GetNumberOfSegments()-1)
    segment.SetName(model_node.GetName())
    segment.SetNameAutoGenerated(False)

    # Create closed surface representation
    segmentation_node.CreateClosedSurfaceRepresentation()

# ... #
Comment 1: ImportModelToSegmentationNode takes the model node to be converted and
the segmentation node to which it should be added as inputs. As when creating
segmentation layers or iterating through the scene, the GetNthNodeByClass
method is used to ensure that references to VTK objects are retrieved in a memory
safe manner.
Comment 2: To ensure that the scene maintains an internally consistent representation,
once nodes are added to the segmentation a "closed surface representation" is created
by calling CreateClosedSurfaceRepresentation.
Export to DICOM-SEG
Once the models have been converted to a segmentation node, it is possible to generate a DICOM-SEG file (which is managed by the DICOMSegmentationPlugin ). Slicer requires that DICOM-SEG files meet two conditions:
- They must be linked to the source images from which they are derived (accomplished earlier by setting the reference volume on the segmentation).
- They must be part of a "subject hierarchy" and have references to a study and patient. Refer to the "DICOM Model of the Real World" for details on how series, studies, and patients are associated with one another.
Retrieve root subject hierarchy node. The subject hierarchy within Slicer is managed via a subject hierarchy node, from which you can retrieve references to all loaded patients and studies. The root subject hierarchy node for the Slicer scene can be retrieved using using the slicer.vtkMRMLSubjectHierarchyNode.GetSubjectHierarchyNode method and providing the active scene reference as shown in the listing below.
#* Script 2, Part 9: Retrieve root subject hierarchy node *#

sh_node = slicer.vtkMRMLSubjectHierarchyNode.GetSubjectHierarchyNode(slicer.mrmlScene)
if sh_node is None:
    raise ValueError("Invalid subject hiearchy node.")
If Slicer is not able to retrieve a valid subject hierarchy root, it will
return None. Should that happen while creating masks, it will not be
possible to create a DICOM-SEG file and an exception should be raised.
Set segmentation node parent. Once the root node has been retrieved for the scene,
the segmentation can be added to the patient/study by copying the subject hierarcy
from the reference volume. Earlier in the script (when iterating through M3D model instances)
a placeholder variable is used to track
the reference volume: ref_vol_node. When a valid reference volume is located,
the value of ref_vol_node will is changed from None to the ref volume.
The listing below shows how the ref_vol_node variable can used to retrieve the patient
and subject hierarchies; and to set the parent of the segmentation as the "study"
within its subject hierarchy.
#* Script 2, Part 10: Retrieve patient and study hierarchy from ref volume *#

# Retrieve parent subject hierarchy node from the reference volume
ref_vol_sh_item = sh_node.GetItemByDataNode(ref_vol_node)

# Retrieve study subject hierarchy
study_sh_item = sh_node.GetItemParent(ref_vol_sh_item)

# Retrieve subject hierarchy node for the segmentation
seg_sh_item = sh_node.GetItemByDataNode(segmentation_node)

# Move the segmentation so that it is a child of the study
sh_node.SetItemParent(seg_sh_item, study_sh_item)
Comment 1: An item's "subject hierarchy" is distinct from its own data class.
The subject hierarchy reference for a node can be retrieved by calling
the GetItemByDataNode of the root subject hierarchy node and providing
the node reference. The subject hierarchy item is distinguished from the MRML node
above by including *_sh_* in the variable name.
Comment 2: The parent of a node must be set using the subject hierarchy item.
Creating the DICOM-SEG file and adding it to the local database.
Once the subject hierarchy has been set, the segmentation node can be exported to
a DICOM-SEG file using the DICOMSegmentationPlugin plugin instance.
#* Script 2, Part 11: Export to DICOM-SEG file *#

# Use DICOMSegmentationPlugin to inspect the
_exportables = seg_exporter.examineForExport(seg_sh_item)
if _exportables:
    seg_exporter.export(_exportables)
Important: The segmentation exporter takes a reference to the subject hierarchy item, not the segmentation node reference.
Complete DICOM-SEG logic. The listing below shows the entire DICOM-SEG export process
provided by the create_dcmseg method, including quality checks and errors.
#* Script 2, Part 12: Export to DICOM-SEG file *#

# Export to DICOM Seg
if segmentation_node.GetReferenceImageGeometryReferenceRole() and ref_vol_node:

    # Retrieve subject hierarchy to write to DICOMSeg
    sh_node = slicer.vtkMRMLSubjectHierarchyNode.GetSubjectHierarchyNode(slicer.mrmlScene)
    if sh_node is None:
        raise ValueError("Invalid subject hiearchy node.")

    # Retrieve parent node and set structural hierarchy references
    ref_vol_sh_item = sh_node.GetItemByDataNode(ref_vol_node)
    study_sh_item = sh_node.GetItemParent(ref_vol_sh_item)
    seg_sh_item = sh_node.GetItemByDataNode(segmentation_node)
    sh_node.SetItemParent(seg_sh_item, study_sh_item)

    # Export to DICOM seg
    _exportables = seg_exporter.examineForExport(seg_sh_item)
    if _exportables:
        seg_exporter.export(_exportables)

else:
    raise ValueError(f"Unable to export patient {p}, study {s} to DICOMSeg, invalid volume reference.")
Memory Management and Garbage Collection
Since data within Script 2 is represented by VTK objects, care must be taken to
access scene references in a memory-safe manner via GetNthNodeByClass
(and similar methods), clearing the scene and subject hierarchy once data has finished
processing, carefully managing persitent references (such as ref_vol_node),
and explicitly performing garbage collection.
The code listing below shows the cleanup done at the end of the create_dcmseg method:
#* Script 2, Part 13: Cleanup, Memory Management, and Garbage Collection *#

# Explicitly clear node references, clear the scene, and garbage collect to ensure
# that all structures are cleared before processing the next patients. mrmlScene.GetNthNodeByClass
# is used to further prevent un-needed structures from being created that might result
# in uncleared references that will hang the program or cause it to crash.
model_node = vol_node = segmentation_node = ref_vol_node = None
slicer.mrmlScene.Clear()
gc.collect()
Main Processing Loop
As noted above, the main processing loop of Script 2 is very similar to
Script 1. The core logic is part of the main try block, with error handling
and cleanup logic appearing in the except block, and Slicer shutdown
and exit occuring in the finally block.
The main loop of Script 2 handles three operations:
- Retrieving the patient list from the database
- Initializing the DICOM plugin and logic instances
- Iterating through patients and studies, checking if a study has already been
processed, and invoking
create_dcmseg
Retrieve Patient List
The UIDs for patients within the Slicer local database can be retrieved by calling the
patients() method:
#* Script 2, Part 14: Retrieve Patient List *#

# Retrieve iterable of patients from slicer database
patients = slicer.dicomDatabase.patients()

# Iterate/enumerate across patient IDs
for i,p in enumerate(patients):

    # p is the string patient ID value
    # [ ... ]
Initialize DICOM Plugin and Logic Instances
While create_dcmseg includes code to initialize the required DICOM plugins
and logic (if they aren't provided as input arguments), the main
loop of Script 2 create root instances which are passed to create_dcmseg to prevent
unnecessary copies.
#* Script 2, Part 15: Initialize Plugins and Logic Instances *#
# [ ... ]

# DICOMPlugin loaders for M3D models and Volume
m3d_loader = slicer.modules.dicomPlugins['DICOMSonador3DPlugin']()
vol_loader = slicer.modules.dicomPlugins['DICOMScalarVolumePlugin']()

# Segmentation logic to convert models to masks and exporter to write to file
seg_logic = slicer.modules.segmentations.logic()
seg_exporter = slicer.modules.dicomPlugins['DICOMSegmentationPlugin']()

# [ ... ]
Process Patient/Study Pairs and Invoke create_dcmseg
Script 2 processes each patient sequentially, iterating through all studies associated with the patient. For each study:
- The script checks the database to determine whether a segmentation (
SEG) instance exists by scanning the modality tag of the series in the study (refer to "Retrieve DICOM instance tag values" above for details of how to fetch tags from local database). - If no segmentation exists,
create_dcmsegis invoked for that study.
#* Script 2, Part 16: Iterate through all patients and studies in the local database *#
# [...]

for i, p in enumerate(patients):
    logger.info(f'Patient {p} {i} / {len(patients)}')
    for s in db.studiesForPatient(p):
        logger.info(f"* Study {s}")

        # Check if study has segmentation
        _sx_modality = set()
        for sx in db.seriesForStudy(s):
            dcm0 = db.instancesForSeries(sx)[0]
            _sx_modality.add(db.instanceValue(dcm0, ','.join(DCMCODE_MODALITY)))

        if DCM_MODALITY_SEG in _sx_modality:
            logger.warning(f"Patient {p} Study {s} has segmentation. Skip seg creation.")

        else:
            try:
                create_dcmseg(p, s, db=db, m3d_loader=m3d_loader, vol_loader=vol_loader,
                    seg_logic=seg_logic, seg_exporter=seg_exporter)
            except Exception as err:
                logger.error(
                    f'Unable to create DICOM seg for patient {p}, study {s} due to an error. Error: "{err}".\n{traceback.format_exc()}')

# [...]
The study instance UIDs associated with a patient are retrieved by calling the
slicer.dicomDatabase.studiesForPatient method.
Running Script 2
The listing below contains the complete logic for Script 2. Save the contents to a text
file called m3d-create-dcmseg.py on the system where Slicer is installed.
# Standard libraryand VTK imports
import sys, os, slicer, logging, sonador, traceback, ctk, \
    urllib3, tempfile, zipfile, gc, vtk

# Sonador libraries for retrieving connection credentials and to configure logging
from sonador.tasks.images import download_imaging_filearchive, stream_imaging_series
from sonador.apisettings import SONADOR_IMAGING_SERVER, DCMCODE_PATIENT_ID, \
    DCMCODE_MODALITY, DCMCODE_SERIES_DESCRIPTION, DCM_MODALITY_M3D, DCM_MODALITY_MR, DCM_MODALITY_SEG
from sonadorqt.base import fetch_sonador_credentials, fetch_sonador_connection
from sonador_ext.scripts import configure_script_logging


# Disable SSL validation warnings to help clean up output
urllib3.disable_warnings()

# Configure logging to stdout for the script
configure_script_logging(level='info')
logger = logging.getLogger(__name__)


def create_dcmseg(p, s, m3d_loader=None, vol_loader=None, seg_logic=None, seg_exporter=None, db=None):
    ''' Create a DICOMseg object from all M3D data within the provided study.

        @input p (str): PatientID for the patient being processed..
        @input s (str): StudyInstanceUID for the study being processed.

        Slicer program components required for export. If not provided as part
        of the method call, then retrieved and initialized form the Slicer modules.

        @input m3d_loader (DICOM loader instance): M3D DICOM plugin instance
            to be used for loading M3D data into the MRML scene.
        @input vol_loader (DICOM loader instance): DICOM plugin instance
            to be used for loading DICOM volume data into the MRML scene.
        @input seg_logic (DICOM SEG plugin instance): DICOM-SEG plugin instance
        @input seg_exporter (DICOM-SEG plugin exporter instance): DICOM-SEG exporter
            instance to be used for exporting segmentation data.
    '''
    # Components required for seg export, if not provided as part of the method call
    # then retrieve and initialize from the slicer modules.
    m3d_loader = m3d_loader or slicer.modules.dicomPlugins['DICOMSonador3DPlugin']()
    vol_loader = vol_loader or slicer.modules.dicomPlugins['DICOMScalarVolumePlugin']()
    seg_logic = seg_logic or slicer.modules.segmentations.logic()
    seg_exporter = seg_exporter or slicer.modules.dicomPlugins['DICOMSegmentationPlugin']()
    db = db or slicer.dicomDatabase

    # Place holder references
    ref_vol_node = None

    for sx in db.seriesForStudy(s):
        dcm0 = db.instancesForSeries(sx)[0]
        patient_id = db.instanceValue(dcm0, ','.join(DCMCODE_PATIENT_ID))
        modality = db.instanceValue(dcm0, ','.join(DCMCODE_MODALITY))
        sx_description = db.instanceValue(dcm0, ','.join(DCMCODE_SERIES_DESCRIPTION))
        logger.info(f' - Patient {patient_id}, Series {sx}, Modality {modality}. Description: "{sx_description}"')

        # Load M3D models and images to scene
        if modality == DCM_MODALITY_M3D:
            for m3d_loadable in m3d_loader.examineFiles(db.filesForSeries(sx)):

                # Load M3D
                m3d_loader.load(m3d_loadable)

                # Load referenced volume
                for vol_loadable in vol_loader.examineFiles(db.filesForSeries(m3d_loadable.referencedSeriesUID)):
                    vol_loader.load(vol_loadable)

    # Create segmentation node
    segmentation_node = slicer.mrmlScene.AddNewNodeByClass('vtkMRMLSegmentationNode')
    segmentation_node.SetName("Segmentation Mask")
    segmentation = segmentation_node.GetSegmentation()

    # Set reference volume for the segmentation
    for i in range(slicer.mrmlScene.GetNumberOfNodesByClass("vtkMRMLScalarVolumeNode")):
        vol_node = slicer.mrmlScene.GetNthNodeByClass(i, "vtkMRMLScalarVolumeNode")
        _img_data = vol_node.GetImageData()

        # Ensure multi-slice volume in all dimensions
        if _img_data and all(_dim > 1 for _dim in _img_data.GetDimensions()):
            segmentation_node.SetReferenceImageGeometryParameterFromVolumeNode(vol_node)
            ref_vol_node = vol_node

    # Iterate through scene to ensure nodes loaded
    for i in range(slicer.mrmlScene.GetNumberOfNodesByClass("vtkMRMLModelNode")):
        model_node = slicer.mrmlScene.GetNthNodeByClass(i, "vtkMRMLModelNode")

        # Add model to segmentation as mask: the segmentation module is used because
        # of the internal complexity of mapping non-overlappying sections. Refer to:
        # https://discourse.slicer.org/t/segmenteditor-consuming-tons-of-memory-3d-slicer-crashes/19014/5.
        # GetNthSegment is used for retrieving the segment reference to prevent dangling pointer
        # errors which might lead to memory leaks.
        _success = seg_logic.ImportModelToSegmentationNode(model_node, segmentation_node)
        segment = segmentation.GetNthSegment(segmentation.GetNumberOfSegments()-1)
        segment.SetName(model_node.GetName())
        segment.SetNameAutoGenerated(False)

        # Create closed surface representation
        segmentation_node.CreateClosedSurfaceRepresentation()

    # Export to DICOM Seg
    if segmentation_node.GetReferenceImageGeometryReferenceRole() and ref_vol_node:

        # Retrieve subject hierarchy to write to DICOMSeg
        sh_node = slicer.vtkMRMLSubjectHierarchyNode.GetSubjectHierarchyNode(slicer.mrmlScene)
        if sh_node is None:
            raise ValueError("Invalid subject hiearchy node.")

        # Retrieve parent node and set structural hierarchy references
        ref_vol_sh_item = sh_node.GetItemByDataNode(ref_vol_node)
        study_sh_item = sh_node.GetItemParent(ref_vol_sh_item)
        seg_sh_item = sh_node.GetItemByDataNode(segmentation_node)
        sh_node.SetItemParent(seg_sh_item, study_sh_item)

        # Export to DICOM seg
        _exportables = seg_exporter.examineForExport(seg_sh_item)
        if _exportables:
            seg_exporter.export(_exportables)

    else:
        raise ValueError(f"Unable to export patient {p}, study {s} to DICOMSeg, invalid volume reference.")

    # Explicitly clear node references, clear the scene, and garbage collect to ensure
    # that all structures are cleared before processing the next patients. mrmlScene.GetNthNodeByClass
    # is used to further prevent un-needed structures from being created that might result
    # in uncleared references that will hang the program or cause it to crash.
    model_node = vol_node = segmentation_node = ref_vol_node = None
    slicer.mrmlScene.Clear()
    gc.collect()


# Exit code
exit_code = 0


try:
    db = slicer.dicomDatabase
    patients = db.patients()

    # DICOMPlugin loaders for M3D models and Volume
    m3d_loader = slicer.modules.dicomPlugins['DICOMSonador3DPlugin']()
    vol_loader = slicer.modules.dicomPlugins['DICOMScalarVolumePlugin']()

    # Segmentation logic to convert models to masks and exporter to write to file
    seg_logic = slicer.modules.segmentations.logic()
    seg_exporter = slicer.modules.dicomPlugins['DICOMSegmentationPlugin']()

    for i, p in enumerate(patients):
        logger.info(f'Patient {p} {i} / {len(patients)}')
        for s in db.studiesForPatient(p):
            logger.info(f"* Study {s}")

            # Check if study has segmentation
            _sx_modality = set()
            for sx in db.seriesForStudy(s):
                dcm0 = db.instancesForSeries(sx)[0]
                _sx_modality.add(db.instanceValue(dcm0, ','.join(DCMCODE_MODALITY)))

            if DCM_MODALITY_SEG in _sx_modality:
                logger.warning(f"Patient {p} Study {s} has segmentation. Skip seg creation.")

            else:
                try:
                    create_dcmseg(p, s, db=db, m3d_loader=m3d_loader, vol_loader=vol_loader,
                        seg_logic=seg_logic, seg_exporter=seg_exporter)
                except Exception as err:
                    logger.error(
                        f'Unable to create DICOM seg for patient {p}, study {s} due to an error. Error: "{err}".\n{traceback.format_exc()}')


except Exception as err:
    exit_code = 1

    # Log any exceptions along with a traceback
    logger.error('Unable to complete batch processing because of an error. Error: "%s"\n%s' % (
        err, traceback.format_exc(),
    ))


finally:

    # Explicit exit the application after all data has been processed. The Slicer
    # process will hang without an explicit exit, which is undesirable for batch scripts.
    vtk.vtkDebugLeaks.SetExitError(0)
    slicer.util.exit()
    exit(exit_code)
The script can be run by calling the Slicer CLI tool and providing the path using the
--python-script option:
# Change Slicer-App.ps1 to slicer if running on Linux or Mac OS X
Slicer-App.ps1 --no-main-window --python-script /path/to/m3d-create-dcmseg.py
Improving DICOM-SEG Creation Using Slicer and Sonador
This article presents a detailed process for batch processing 3D medical data and converting it into DICOM-SEG format using 3D Slicer. By leveraging open-source tools and integrating the Sonador platform, the approach automates key steps:
- retrieving imaging data from a Sonador/Orthanc medical database
- processing M3D models to create binary masks
- exporting the results as DICOM-SEG files
The process is implemented through two custom scripts that handle data retrieval, processing, and export. The first script automates the import of imaging and model data into the Slicer local database, ensuring efficient local processing and state management. The second script creates segmentation layers for each model, aligns them to the imaging coordinate system, and exports them as DICOM-SEG files. Though not explicitly covered in this article, the final step (uploading data back to Sonador) can be facilitated by the Sonador IO extension.
This solution significantly reduces the time and effort required to prepare medical imaging data for advanced applications, such as AI model training. Automating the retrieval, processing, and export steps ensures consistency, minimizes manual errors, and enhances reproducibility across large datasets. Combining the standards-compliant capabilities of Sonador with the flexibility and power of 3D Slicer, this approach leverages open-source tools to provide a robust, interoperable solution. The integration enables seamless data handling and compatibility with a wide range of imaging and analysis systems, making it a viable option for both research and clinical operations.
Comments
Loading
No results found