Using Gitlab as an Identity Provider for Apache Airflow 2
Apache Airflow is an open source workflow manager used for working with creating, scheduling, and monitoring workflows and has become an important tool for data engineering. Because AirFlow is often used to work with data containing sensitive information, ensuring it is securely configured and only authorized users are able to access the dashboard and APIs is an important part of its deployment.
Many organizations use technologies like Single Sign-On (SSO), Active Directory, and LDAP to help centralize user management and systems access. Centralized user management gives organizations better control over who has access to important systems and helps to lower the threat of data breaches by providing a central location for monitoring systems access and credential management.
In this blog post, we will look at how to enable SSO for Apache AirFlow using GitLab as an Identity Provider (IdP). We'll review the underlying system Airflow uses to provide its security (Flask-AppBuilder), the steps needed to provision an "application" within GitLab, how to configure AirFlow to work with GitLab as an OpenID IdP, and how the application can be deployed using Docker.
AirFlow Security and Flask App Builder
Under the hood, Airflow uses Flask-AppBuilder for managing authentication and administrative permissions. AppBuilder is a framework that handles many of the common challenges of creating websites, including workflows needed for admin scaffolding and security. It supports the following types of remote authentication:
- OpenID: credentials are stored on a remote server called an identity provider, to which Airflow directs the user during login. Many popular online services providers such as Google, Microsoft, and GitHub run identity servers compatible with OpenID. The identity provider verifies the account credentials and redirects the user back to the original application along with a special code (called a token) indicating that they were authenticated correctly. The credentials are not shared with Airflow directly.
- LDAP: user information and credentials are stored on a central server (such as Microsoft Active directory) and authentication requests are forwarded to the server for verification.
REMOTE_USER: relies on the environment variable REMOTE_USER on the web server, and checks whether it has been authorized within the framework users table, placing responsibility on the web server to authenticate the user. This makes it ideal for use by intranet sites or when the web server is configured to use the Kerberos Authentication Protocol.
This article focuses on the OpenID method of authentication (specifically the OpenID Connect) using GitLab as an IdP. Because it is often desirable to limit access to a subset of users within an IdP, we will show how GitLab groups can further be leveraged as a way of allowing members of only one group to access the AirFlow instance.
Here are the steps we will follow to implement SSO:
- Create and configure an "application" in GitLab which registers Airflow as a system authorized to use GitLab as an IdP. Creating an application within GitLab creates a "trust" between the two systems that is verified using a special "ID" and token prevents attackers from being able to steal credentials that would allow them access to Airflow.
- Create a directory to organize the files required by Airflow for SSO.
- Build a Dockerfile which can package Airflow and the dependencies required by OpenID Connect (OIDC).
- Implement a security manager that supports OIDC.
- Create a secrets file that provides Airflow the application configuration from GitLab and the URLs need for authentication, retrieving user data, and for notifying the IdP that a user has logged out.
- Build the image using the Dockerfile.
- Create a Docker Compose "orchestration" file that allows for the Docker image and SSO configuration to be tested.
- Run and test the application.
Prerequisites
To follow this guide, you will need to have access to a GitLab instance (for which you have administrative permissions) and Docker and Docker Compose installed locally. Deploying Airflow is outside of the scope of this document. If you are new to Airflow, it is recommended to follow the quick start guide before proceeding.
Step 1: Configure a GitLab OpenID Application
The first step in configuring GitLab as an SSO provider is to create an "application" that will be used by Airflow to request a user's credentials. GitLab supports creating applications that are specific to a user, members of a particular group, or to all users.
In this article we will be using an "instance wide application" that is available to all users of GitLab and then inspecting which GitLab groups the user is a member of from Airflow. It's possible to restrict access to an application by also creating a "Group" application instance. If you are following the steps in this tutorial, but do not have administrative access to a GitLab instance, instructions for creating a "User" application are included. In production environments, it is recommended to create an "Instance" or "Group" application.
GitLab Instance Application
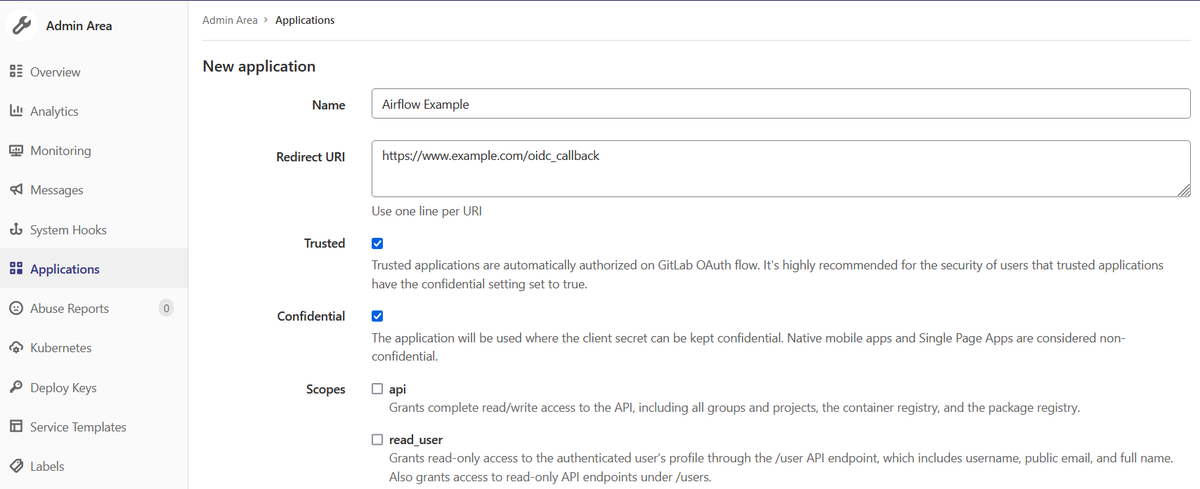
To create a new application for the instance, click on the "Admin Area" link in the menu bar and then select "Applications" in the sidebar. From there, you can add a new application by clicking on the "New Application" button. You will be prompted to provide an application name, a redirect URI, and to set the application’s permissions. The following settings are particularly important:
- Name: this is the application title as it will appear in GitLab
- Redirect URI: this is the endpoint to which GitLab will redirect users after they have been authenticated. The redirect URI for AirFlow should be in this format:
scheme://your.domain.com/oidc_callback. Scheme will either behttporhttps. Example:https://www.example.com/oidc_callback. If you are configuring a system deployed in Kubernetes or on the network, the redirect URI will be the URL you use to connect to the system. For local or development you can uselocalhost. Example:http://localhost:8060. - Trusted: this toggles whether a user will be presented with an "authorize" screen that allows them to give their permission to have their user profile data shared with Airflow.
- Confidential: this setting controls how the application secret is managed. The application secret is a token provided by Airflow to prove that it has been authorized to use GitLab for authentication. It is important for ensuring that both Airflow and the IdP remain secure and "Confidential" should be checked.
- Scopes - The scopes define what level of access the application will have to GitLab's user database. In this case,
openid,profile, andemailwill be enough. Data about which groups the user belongs to are provided via theopenidscope.
After providing the name, redirect URI, and scope options click on "Submit" to create the application instance.


GitLab User Application
If you do not have administrative access to GitLab to create an instance application, you can also create a user application, which are available via your user profile. You can access the user application settings by clicking on the "Edit profile" link and then selecting "Applications" from the sidebar. As with the instance application above; provide the name, redirect URI, and scopes for the application and then click on "Save application."
Make Note of Application ID and Secret
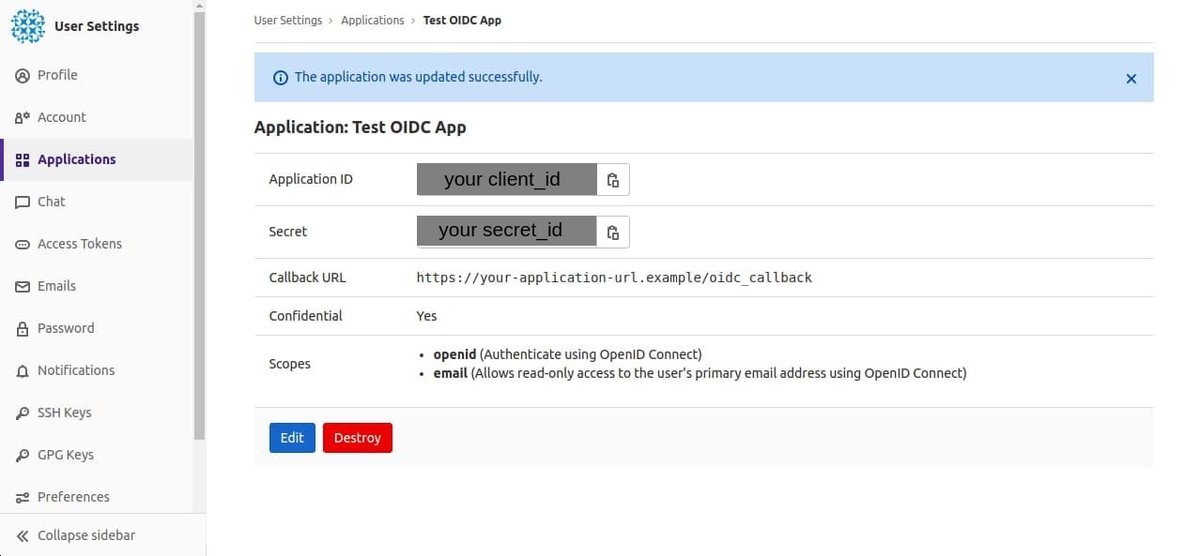
Once an application (either GitLab instance or user) has been created, you will see a screen similar to the figure below. Make note of the application ID and secret values; they are important for future steps and will be used in configuration files later in this tutorial.

Step 2: Create AirFlow Configuration Directory
To enable OpenID Connect based SSO, Airflow requires a set of configuration files. These include a client_secret.json which provides the GitLab endpoint, application ID, and secret (from above); and a "security manager" (a Python class which handles the mechanics of authentication) which will be created in a custom webserver_config.py file. To make deployment of Airflow after adding these components easier, we will package it as a Docker container (using a Dockerfile).
The commands in the listing below create a directory for these files. This directory will be used as a staging location for the remainder of the tutorial.
# Create directory for AirFlow configuration files
mkdir openid-app

# Change to the directory
cd openid-app
If you are modifying an existing Airflow deployment, you can omit this step and place the files in the root AirFlow folder.
Step 3: Create a Docker Image
To allow Airflow to take advantage of OpenID Connect, we need to install a set of dependencies. By default, Flask-AppBuilder uses the Flask-OpenID Python package when using the OpenID authentication type, which only supports OpenID version 2.0.
OpenID Connect is a newer iteration of the OpenID protocol built on top of oAuth version 2.0 and provides a number of enhancements. To allow for Airflow to use OpenID-Connect, we will install the Flask-OIDC package.
The commands in the listing below create a Dockerfile that can be used to install Flask-OIDC and the additional dependencies for OpenID Connect authentication. We will use the official Docker image for Airflow 2 from the Apache Foundation as a starting point.
# Create Dockerfile to install the dependencies required by Flask AppBuilder
touch Dockerfile

# Open the Dockerfile for editing
vim Dockerfile
After creating the file, open it with vim (or another text editor of your choice) and add the following:
FROM apache/airflow:2.1.4-python3.8

# Change container image to root user to allow for global
# installation of software
USER root
RUN apt-get update && apt-get install -y git \
    && pip3 install --upgrade pip

# Install dependencies needed for OpenID connect authentication.
# These pip, requests, and flasks-oidc. The packages are installed
# within the user context.
USER airflow
RUN pip3 install requests flask-oidc aiohttp

# Copy the OIDC webserver_config.py into the container's $AIRFLOW_HOME
COPY webserver_config.py $AIRFLOW_HOME/webserver_config.py
The Dockerfile above installs git; updates pip; and fetches requests, aiohttp, and flask-oidc from PyPI. The installation is done as the airflowuser so that the libraries will be available in the user Python site-packages. This is required by the Apache Airflow container in order for them to be visible at runtime. The Dockerfile then copies the webserver_config.py file (which will be created below and provides the Python class which enables OpenID Connect authentication) into the $AIRFLOW_HOME directory.
Step 4: Implement a Security Manager That Allows Use of OpenID Connect
When you first start Airflow, it generates a special file named webserver_config.py in the Airflow home directory ($AIRFLOW_HOME). webserver_config.py provides the configuration for Flask-AppBuilder and is where we will put the code needed to implement OpenID authentication.
Authentication, user permissions, and runtime security within AppBuilder applications is provided via an object called the "security manager." Airflow provides a specialized security manager called AirflowSecurityManager (available from the airflow.www.security package) which will be the foundation of the OpenID Connect features we will add.
In this section, we will create a custom AirflowSecurityManager subclass that:
- Implements an OpenID Connect view (
AuthOIDCView) to authenticate users from GitLab. - Creates a custom security manager (
OIDCSecurityManager) that uses the OpenID Connect view for authentication workflows. - Configures Airflow to use the custom security manager for authentication (the security manager is controlled using the
SECURITY_MANAGER_CLASSvariable). - Loads configuration parameters such as the URL of the GitLab instance, the application ID, and secret from a
client_secret.jsonfile (which will be mounted into the container at runtime). - Provides an environment variable (
GITLAB_ALLOWED_GROUPS) that can be used to limit access to Airflow by requiring that a user be a member of a specific group.
The code in the listing below provides the custom webserver_config.py.
import os, logging, json, posixpath

from airflow import configuration as conf
from airflow.www.security import AirflowSecurityManager
from flask import abort, make_response, redirect
from flask_appbuilder.security.manager import AUTH_OID
from flask_appbuilder.security.views import AuthOIDView
from flask_appbuilder.views import ModelView, SimpleFormView, expose
from flask_login import login_user
from flask_oidc import OpenIDConnect

logger = logging.getLogger(__name__)

# Set the OIDC field that should be used
NICKNAME_OIDC_FIELD = 'nickname'
FULL_NAME_OIDC_FIELD = 'name'
GROUPS_OIDC_FIELD = 'groups'
EMAIL_FIELD = 'email'
SUB_FIELD = 'sub'  # User ID


# Convert groups from comma separated string to list
ALLOWED_GITLAB_GROUPS = os.environ.get('ALLOWED_GITLAB_GROUPS')
if ALLOWED_GITLAB_GROUPS:
    ALLOWED_GITLAB_GROUPS = [g.strip() for g in ALLOWED_GITLAB_GROUPS.split(',')]
else: ALLOWED_GITLAB_GROUPS = []

if ALLOWED_GITLAB_GROUPS:
    logger.debug('AirFlow access requires membership to one of the following groups: %s'
        % ', '.join(ALLOWED_GITLAB_GROUPS))


# Extending AuthOIDView
class AuthOIDCView(AuthOIDView):

    @expose('/login/', methods=['GET', 'POST'])
    def login(self, flag=True):

        sm = self.appbuilder.sm
        oidc = sm.oid

        @self.appbuilder.sm.oid.require_login
        def handle_login():
            user = sm.auth_user_oid(oidc.user_getfield(EMAIL_FIELD))

            # Group membership required
            if ALLOWED_GITLAB_GROUPS:

                # Fetch group membership information from GitLab
                groups = oidc.user_getinfo([GROUPS_OIDC_FIELD]).get(GROUPS_OIDC_FIELD, [])
                intersection = set(ALLOWED_GITLAB_GROUPS) & set(groups)
                logger.debug('AirFlow user member of groups in ACL list: %s' % ', '.join(intersection))

                # Unable to find common groups, prevent login
                if not intersection:
                    return abort(403)

            # Create user (if it doesn't already exist)
            if user is None:
                info = oidc.user_getinfo([
                    NICKNAME_OIDC_FIELD,
                    FULL_NAME_OIDC_FIELD,
                    GROUPS_OIDC_FIELD,
                    SUB_FIELD,
                    EMAIL_FIELD,
                    "profile"
                ])
                full_name = info.get(FULL_NAME_OIDC_FIELD)
                if " " in full_name:
                    full_name = full_name.split(" ")
                    first_name = full_name[0]
                    last_name = full_name[1]
                else:
                    first_name = full_name
                    last_name = ""
                user = sm.add_user(
                    username=info.get(NICKNAME_OIDC_FIELD),
                    first_name=first_name,
                    last_name=last_name,
                    email=info.get(EMAIL_FIELD),
                    role=sm.find_role(sm.auth_user_registration_role)
                )

            login_user(user, remember=False)
            return redirect(self.appbuilder.get_url_for_index)

        return handle_login()

    @expose('/logout/', methods=['GET', 'POST'])
    def logout(self):
        oidc = self.appbuilder.sm.oid
        if not oidc.credentials_store:
            return redirect('/login/')
        self.revoke_token()
        oidc.logout()
        super(AuthOIDCView, self).logout()
        response = make_response("You have been signed out")
        return response

    def revoke_token(self):
        """ Revokes the provided access token. Sends a POST request to the token revocation endpoint
        """
        import aiohttp
        import asyncio
        import json
        oidc = self.appbuilder.sm.oid
        sub = oidc.user_getfield(SUB_FIELD)
        config = oidc.credentials_store
        config = config.get(str(sub))
        config = json.loads(config)
        payload = {
            "token": config['access_token'],
            "token_type_hint": "refresh_token"
        }
        auth = aiohttp.BasicAuth(config['client_id'], config['client_secret'])
        # Sends an asynchronous POST request to revoke the token

        async def revoke():
            async with aiohttp.ClientSession() as session:
                async with session.post(self.appbuilder.app.config.get('OIDC_LOGOUT_URI'), data=payload, auth=auth) as response:
                    logging.info(f"Revoke response {response.status}")

        loop = asyncio.new_event_loop()
        asyncio.set_event_loop(loop)
        loop.run_until_complete(revoke())


class OIDCSecurityManager(AirflowSecurityManager):
    """
    Custom security manager class that allows using the OpenID Connection authentication method.
    """
    def __init__(self, appbuilder):
        super(OIDCSecurityManager, self).__init__(appbuilder)
        if self.auth_type == AUTH_OID:
           self.oid = OpenIDConnect(self.appbuilder.get_app)
           self.authoidview = AuthOIDCView


basedir = os.path.abspath(os.path.dirname(__file__))

SECURITY_MANAGER_CLASS = OIDCSecurityManager
# The SQLAlchemy connection string.
SQLALCHEMY_DATABASE_URI = conf.get('core', 'SQL_ALCHEMY_CONN')

# Flask-WTF flag for CSRF
CSRF_ENABLED = True

AUTH_TYPE = AUTH_OID
OIDC_CLIENT_SECRETS = 'client_secret.json'  # Configuration file for Gitlab OIDC
OIDC_COOKIE_SECURE= False
OIDC_ID_TOKEN_COOKIE_SECURE = False
OIDC_REQUIRE_VERIFIED_EMAIL = False
OIDC_USER_INFO_ENABLED = True
CUSTOM_SECURITY_MANAGER = OIDCSecurityManager

# Ensure that the secrets file exists
if not os.path.exists(OIDC_CLIENT_SECRETS):
    ValueError('Unable to load OIDC client configuration. %s does not exist.' % OIDC_CLIENT_SECRETS)

# Parse client_secret.json for scopes and logout URL
with open(OIDC_CLIENT_SECRETS) as f:
    OIDC_APPCONFIG = json.loads(f.read())

# Ensure that the logout/revoke URL is specified in the client secrets file
GITLAB_OIDC_URL = OIDC_APPCONFIG.get('web', {}).get('issuer')
if not GITLAB_OIDC_URL:
    raise ValueError('Invalid OIDC client configuration, GitLab OIDC URI not specified.')

OIDC_SCOPES = OIDC_APPCONFIG.get('OIDC_SCOPES', ['openid', 'email', 'profile'])  # Scopes that should be requested.
OIDC_LOGOUT_URI = posixpath.join(GITLAB_OIDC_URL, 'oauth/revoke') # OIDC logout URL


# Allow user self registration
AUTH_USER_REGISTRATION = False

# Default role to provide to new users
AUTH_USER_REGISTRATION_ROLE = os.environ.get('AUTH_USER_REGISTRATION_ROLE', 'Public')

AUTH_ROLE_ADMIN = 'Admin'
AUTH_ROLE_PUBLIC = "Public"


OPENID_PROVIDERS = [
   {'name': 'Gitlab', 'url': posixpath.join(GITLAB_OIDC_URL, 'oauth/authorize')}
]
Create a new file called webserver_config.py in the configuration directory (alongside the Dockerfile created earlier) and copy/paste the code into the new file. The custom security manager provides a small set of parameters that can be used to tune its behavior. These include:
- An environment variable called
ALLOWED_GITLAB_GROUPSthat can be used to specify a comma separated list of groups to which a user must belong in order to access the Airflow instance. If a value is provided for the variable, the group ACL logic will be triggered. If not, any user which has an account on the GitLab instance will be able to access GitLab. - A second environment variable called
AUTH_USER_REGISTRATION_ROLE, which can be used to determine the role/permissions that new accounts from GitLab will receive in Airflow. The default value is "Public" (or anonymous). Public users do not have any permissions.
Step 5: Create client_secret.json
The last file needed to enable OpenID Connect authentication is client_secret.json which contains the GitLab URL, client ID/secret (obtained in step 1), and the redirect URL of Airflow. The code in the listing below shows the structure of the file.
{
  "web":{
     "issuer":"<your-gitlab-url>",

     "client_id":"<oidc-client-id>",
     "client_secret":"<oidc-client-secret>",
     "auth_uri":"<your-gitlab-url>/oauth/authorize",
     "redirect_urls":[
        "<airflow-application-url>",
        "<airflow-application-url>/oidc_callback",
        "<airflow-application-url>/home",
        "<airflow-application-url>/login"
     ],

     "token_uri":"<your-gitlab-url>/oauth/token",
     "userinfo_uri": "<your-gitlab-url>/oauth/userinfo"
  }
}
Create a file called client_secret.json (alongside the Dockerfile and webserver_config.py from steps 3 and 4) and copy the structure in the listing above. Then modify the following parameters to values appropriate for your environment:
client_id: Application ID obtained when registering Airflow on GitLabclient_secret: Secret from GitLab<your-airflow-url>: URL for the Airflow instance (example:https://airflow.example.com)<your-gitlab-url>: URL of the GitLab instance to be used as the identity provider (example:https://gitlab.example.com)
Step 6: Build the Docker Image
Once the configuration files have been created, the next step is to build the Docker image. The command below will create a Docker image tagged as airflow-oidc.
# Create a Docker image with the OpenID connect enabled AirFlow
# '.' refers to the Dockerfile, run this commmand in the same directory as the Dockerfile
docker build -t airflow-oidc .
Step 7: Create a Docker Compose File
The official Apache Airflow image is designed to be be run in a production environment and can be difficult to test and deploy. For this reason, it is convenient to create an "orchestration file" using Docker Compose for testing. The code in the listing below provides a sample Docker Compose file which:
- defines a shared set of environment variables for a scalable Airflow runtime with the web dashboard, scheduler, background worker (using the Celery executor), a standalone database (PostgreSQL), and a RabbitMQ message broker
- creates service entries for each of the components needed for the deployment along with healthchecks to ensure the environment is operational
- provides the configuration needed for GitLab based SSO by mounting
client_secret.jsonfrom the configuration directory
The manifest below references the image created in Step 6 (tagged as airflow-oidc). If you chose a different tag when building your image, you will need to modify the image value under x-airflow-common.
version: '3.8'


# AirFlow runtime environment
x-airflow-common:
  &airflow-common
  image: airflow-oidc
  environment:
    &airflow-common-env
    SECRET_KEY: 'jCmrrylZiSrEJWAXqDxxzdX379ugMv+kd7wOgV7GSX4g/f8o8pMFiFj4ejiW17jz'
    AIRFLOW__CORE__EXECUTOR: CeleryExecutor
    AIRFLOW__CORE__SQL_ALCHEMY_CONN: postgresql+psycopg2://airflow:airflow@airflow-postgres/airflow
    AIRFLOW__CELERY__RESULT_BACKEND: db+postgresql://airflow:airflow@airflow-postgres/airflow
    AIRFLOW__CELERY__BROKER_URL: amqp://guest:guest@message-broker:5672
    AIRFLOW__CORE__FERNET_KEY: 'ZmDfcTF7_60GrrY167zsiPd67pEvs0aGOv2oasOM1Pg='
    AIRFLOW__CORE__DAGS_ARE_PAUSED_AT_CREATION: 'true'
    AIRFLOW__CORE__LOAD_EXAMPLES: 'false'
    AIRFLOW__API__AUTH_BACKEND: 'airflow.api.auth.backend.basic_auth'
    AIRFLOW_WWW_USER_USERNAME: 'airflow'
    AIRFLOW_WWW_USER_PASSWORD: 'example-password@gitlab-sso'

    # Comma separated list of GitLab groups that the user should be a member of
    # in order to be able to access AirFlow. Uncomment to enable.
    # ALLOWED_GITLAB_GROUPS: 'gitlab_group1,gitlab_group2'

  volumes:
  - client_secret.json:/opt/airflow/client_secret.json:ro

  user: "${AIRFLOW_UID:-50000}:${AIRFLOW_GID:-50000}"
  depends_on:
  - airflow-postgres


# Services
services:

  airflow-postgres:
    image: postgres:13
    environment:
      POSTGRES_USER: airflow
      POSTGRES_PASSWORD: airflow
      POSTGRES_DB: airflow
    volumes:
    - postgres-db-volume:/var/lib/postgresql/data
    healthcheck:
      test: ["CMD", "pg_isready", "-U", "airflow"]
      interval: 5s
      retries: 5
    restart: always

  airflow-webserver:
    <<: *airflow-common
    command: webserver
    ports:
    - 8060:8080
    healthcheck:
      test: ["CMD", "curl", "--fail", "http://localhost:8080/health"]
      interval: 10s
      timeout: 10s
      retries: 5
    restart: always

  airflow-scheduler:
    <<: *airflow-common
    command: scheduler
    healthcheck:
      test: ["CMD-SHELL", 'airflow jobs check --job-type SchedulerJob --hostname "$${HOSTNAME}"']
      interval: 10s
      timeout: 10s
      retries: 5
    restart: always

  airflow-worker:
    <<: *airflow-common
    command: celery worker
    healthcheck:
      test:
      - "CMD-SHELL"
      - 'celery --app airflow.executors.celery_executor.app inspect ping -d "celery@$${HOSTNAME}"'
      interval: 10s
      timeout: 10s
      retries: 5
    restart: always

  airflow-init:
    <<: *airflow-common
    command: version
    environment:
      <<: *airflow-common-env
      _AIRFLOW_DB_UPGRADE: 'true'
      _AIRFLOW_WWW_USER_CREATE: 'true'
      _AIRFLOW_WWW_USER_USERNAME: ${_AIRFLOW_WWW_USER_USERNAME:-airflow}
      _AIRFLOW_WWW_USER_PASSWORD: ${_AIRFLOW_WWW_USER_PASSWORD:-airflow}

  flower:
    <<: *airflow-common
    command: celery flower
    ports:
    - 5555:5555
    healthcheck:
      test: ["CMD", "curl", "--fail", "http://localhost:5555/"]
      interval: 10s
      timeout: 10s
      retries: 5
    restart: always

  message-broker:
    image: rabbitmq:3-management
    ports:
    - 5672:5672
    - 15672:15672

volumes:
  postgres-db-volume:
Create a new file called airflow-etl.yaml in the configuration directory and copy the code from the listing above. The configuration as provided will allow you to test the container images and custom security manager, but some values should be modified before deploying into a staging or production environment. The following parameters are used for managing the environment:
- Airflow environment
AIRFLOW__CORE__FERNET_KEY: the key used for encrypting data inside of the database. Follow this guide to generate a new value.SECRET_KEY: value used by Flask to secure sensitive Airflow parameters. The secret key uniquely identifies the application instance and should be changed for staging or production environments.ALLOWED_GITLAB_GROUPS: the GitLab groups whose users will be allowed access to the Airflow instance.AIRFLOW_CELERY__BROKER_URL: URL used to connect to RabbitMQ (or a similar message broker) for dispatching jobs and tasks. The URL should include the connection string to the instance with the username and password.AIRFLOW_WWW_USER_USERNAME: default admin account (non-SSO) for the Airflow instance.AIRFLOW_WWW_USER_PASSWORD: password for the admin account
- PostgreSQL environment
POSTGRES_USER: username of the database userPOSTGRES_PASSWORD: password for the database userPOSTGRES_DB: database name
Step 8: Run the Application
You can deploy a test instance of the Airflow configuration described in airflow-etl.yaml using the command in the listing below:
docker-compose -f airflow-etl.yaml up
The environment uses seven containers, initializes the Airflow database, and configures RabbitMQ as a message broker. For this reason, it may take a minute or two to start. Watch the application logs until you see "Airflow Webserver Ready" in the output.
Step 9: Test the Configuration
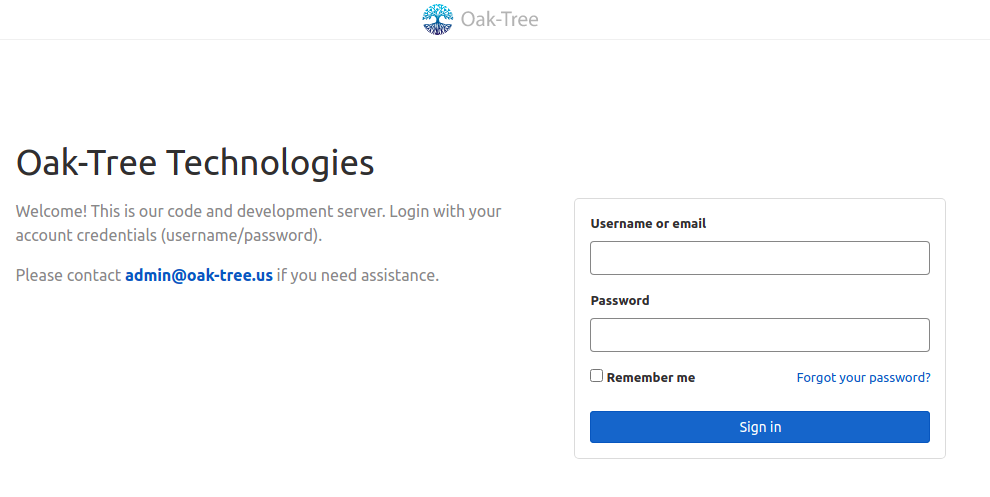
Once the system has fully initialized, you can test the configuration by navigating to the Airflow webserver URL in the browser. If using the Docker Compose manifest above, this will be http://localhost:8060. If everything is configured correctly, you will be forwarded to GitLab to login. After successful authentication, you will be redirected back to the Airflow dashboard.

Step 10: Authorize Roles for the New Airflow User
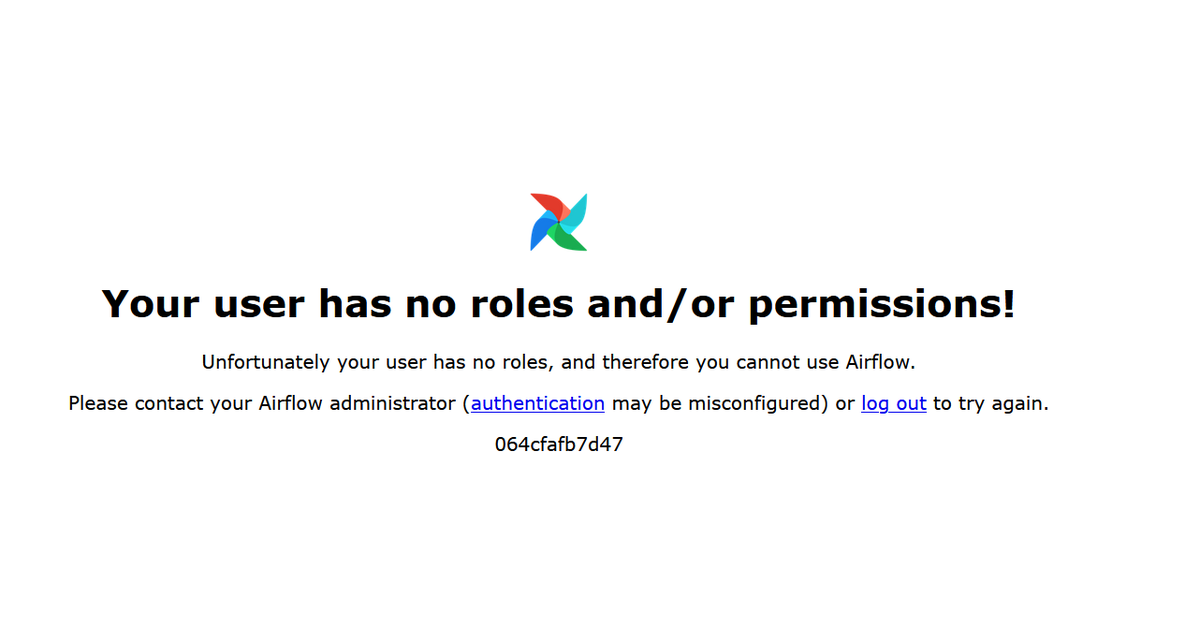
Depending on the default role that is specified for your environment, when you first authenticate you may see a page similar to that in the figure below. This is because your Airflow user was created without access to any permissions.

User roles and permission can be controlled using the users add-role command of the airflow CLI tool (which is available within the container image) and can be accessed using docker exec. The commands in the listing below show how to exec to the webserver container instance and allocate an Admin role to a user called username.
# docker ps to find the container ID
docker ps
CONTAINER ID   IMAGE         COMMAND                  CREATED          STATUS                    PORTS                                     NAMES
67ac02cd82cc   airflow-oidc  "/usr/bin/dumb-init …"   48 minutes ago   Up 13 minutes (healthy)   0.0.0.0:8060->8080/tcp,:::8060->8080/tcp  openid-app_airflow-webserver_1

# docker exec to one of the container instances to access the Airflow CLI tools.
# The sample command below uses the webserver container instance.
# Run from the development machine,.
docker exec -it 67ac02cd82cc bash

# Grant Admin permissions to the "username" user (run from inside the container instance).
airflow users add-role -u username -r Admin
Comments
Loading
No results found