A Docker Based Lab for Data Development
As organizations become increasingly reliant on data services for their core missions, having access to systems such as storage, cluster computing, and streaming technologies becomes increasingly important. It allows for the use and analysis of data which would be very difficult to work with using other technologies.
There are three broad categories of data systems:
- Storage. Data needs a place to live. Storage systems such as HDFS or Object Storage (such as Amazon S3), distributed relational databases like Galera and Citus, and NoSQL provide the medium for information to be consumed for analytics and machine learning. Because such systems frequently require that data be processed in large volume, they also redundantly store information so that it can be read and written in parallel.
- Compute. Compute provides the brains of Big Data. Compute systems, like Hadoop MapReduce and Spark, provide the toolbox for performing scalable computation. Such resources can be used for performing analytics, stream processing, machine learning, and others.
- Streaming. Streaming systems like Apache Kafka provide ways to integrate Big Data technologies using a common interchange. This allows for systematic enrichment and analysis; and the integration of data from multiple sources.
Experimenting With Integrated Technologies
In this guide, we will walk you through deployment of a Docker based environment that provides:
- Python 3.10, the standard Python based data libraries, Spark (which has been integrated with Python so that you are able to use the
pysparkshell), TensorFlow, PyTorch, and Jupyter (along with its new integrated development environment, JupyterLab) - MinIO, an S3 compatible object storage which is often used for cloud-native data storage
- Apache Kafka, a high performance distributed streaming platform that is used for enabling the exchange of data between systems and bulding real-time streaming data pipelines that are used for powering analytics/machine learning
- ZooKeeper, a runtime dependency of Apache Kafka
The deployment files and a set of example notebooks which demonstrate the capabilities of the environment are located in the Oak-Tree PySpark public repository and have been validated to work on Ubuntu 22.04+ (Nov 19, 2024 update: the instructions in this article also work on older versions of Ubuntu such as 20.04).

In this article you will perform the following steps required to deploy the environment:
- Install and use Git to retrieve the environment configuration manifests
- Install and deploy Docker and `docker-compose`
- Deploy and experiment with Spark, Jupyter, Kafka, and ZooKeeper as a set of integrated containers
Before following this guide, you will need access to a Ubuntu 22.04+ LTS or above machine or virtual machine.
Install Docker and Deploy JupyterLab
All code text that looks like this represents terminal input/output. Any code that starts with $ signifies a command you must enter in the command line. Commands which terminate with a backslash (\) have been split across multiple lines for readability.
Using a backslash within a Linux shell such as BASH is valid syntax, and the commands can be copied form this guide and used without changing them, with the exception of omitting the dollar sign $.
Example commands and resulting output:
# Example of a simple command
$ input-command

<output resulting from command>

# Example of a multi-line command. This command
# may be copied from the listing and used directly
# in a terminal (just be sure to omit the dollar sign)
$ echo "Hello world!" \
    | wc
1. Install git
To install git, open a terminal and type the following:
# Update local package repositories
$ sudo apt update

# Install git
$ sudo apt-get install git
If you are following this lab as part of a course, the instructor will provide the password needed for the
sudo passwordinput. When prompted to continue[Y/n], press theYkey and hit enter.
When git has finished installing, your terminal output should look similar to the image below.

2. Install docker.io and docker-compose
- Install
docker.iopackage - Install
docker-compose
2.1. Install docker.io
Update the package manager and install the Ubuntu maintained community version of Docker,
which is available as the docker.io package.
Docker comes in a variety of flavors including the "Ubuntu community version" and an official
"Docker maintained" version. We usually recommend that users install the Ubuntu community
verison (which is based on containerd and a Docker
comptibility plugin.
# Update all platform packages to ensure that the system is up
# to date before installing Docker
$ sudo apt-get upgrade && sudo apt-get upgrade

# Install Docker.io
$ sudo apt-get install docker.io
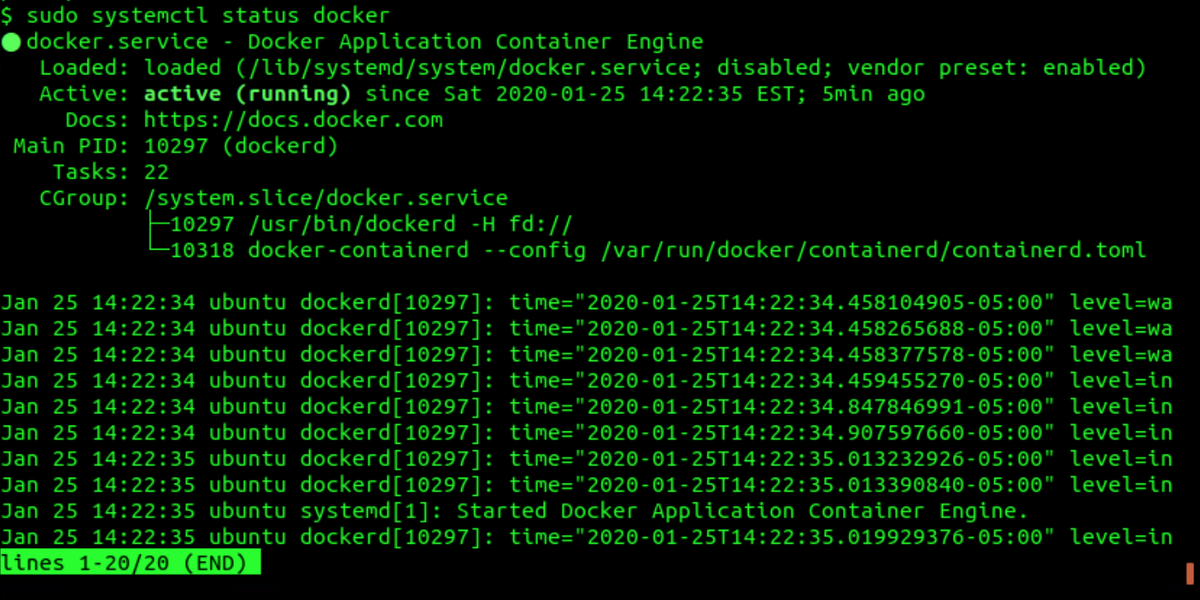
After your system finishes the installation of Docker, you can
verify the status via systemctl:
$ sudo systemctl status docker
The output should look similar to the screenshot below. You can exit
the status output by pressing Q.
2.2. Install docker-compose
The instructions below install Docker compose via direct package download.
Docker Compose may also be available in the system packages, and its worth
using apt search docker-compose to look for a binary that will match
your build of Docker.
Step 1: Install curl
# Install curl from package repositories
sudo apt-get install curl
Step 2: Download docker-compose and save it as docker-compose in the
home directory (~/).
# Navigate to the user's home directory
$ cd ~/

# Download Docker compose to the local folder and change the name
# to `docker-compose`
$ curl -L https://oak-tree.tech/documents/101/docker-compose-Linux-x86_64 \
    -o ./docker-compose
Step 3: set executable permissions for docker-compose so that it can be used
crom the CLI.
$ chmod +x docker-compose
Step 4: Check that docker-compose works against the locally installed Docker
version.
$ ./docker-compose --version

docker-compose version 1.21.2, build a133471
Step 5: Move the binary to /usr/local/bin so that it is available in the
global path.
$ sudo mv ./docker-compose /usr/local/bin
Step 6: Verify that docker-compose is available in the global path
and it is possible to execute orchestration with it.
# Use which to check for docker-compose in the path
$ which docker-compose

/usr/local/bin/docker-compose
3. Deploy and Experiment with JupyterLab
In the home directory, use git to clone the example-files to your machine:\
# Change to the user's home directory
$ cd ~

# Clone Oak-Tree PySpark repository to the home directory
$ git clone https://code.oak-tree.tech/oak-tree/medical-imaging/imaging-development-env.git \
    pyspark-examples
Navigate inside the repository and start-up the docker-compose deployment:
$ cd pyspark-examples/
Execute the docker-compose.yaml file. This file will deploy a ZooKeeper, Spark, Jupyter, and Kafka instances. After execution of the command, you will see a lot of logs run through your terminal, these are the instances being deployed.
$ sudo docker-compose -f compose/core.yaml \
    -f compose/analytics.yaml up
Once the deployments have finished initializing, search the console output for the Jupyter URL. You can use the Find function by pressing CTRL+SHIFT+F in your terminal.
Search for 127.0.0.1:8888 and you will find the entire Jupyter URL to access the hub.
The manifests in the repository are split into a number of different compose files allowing for different components of the architecture to be activated as needed. The example commands in this file activate the
compose/analytics.yamlandcompose/core.yaml.
core.yamlhas the environment description for MinIO (object storage) and Kafka (data streaming) andanayltics.yamlfor JupyterLab.
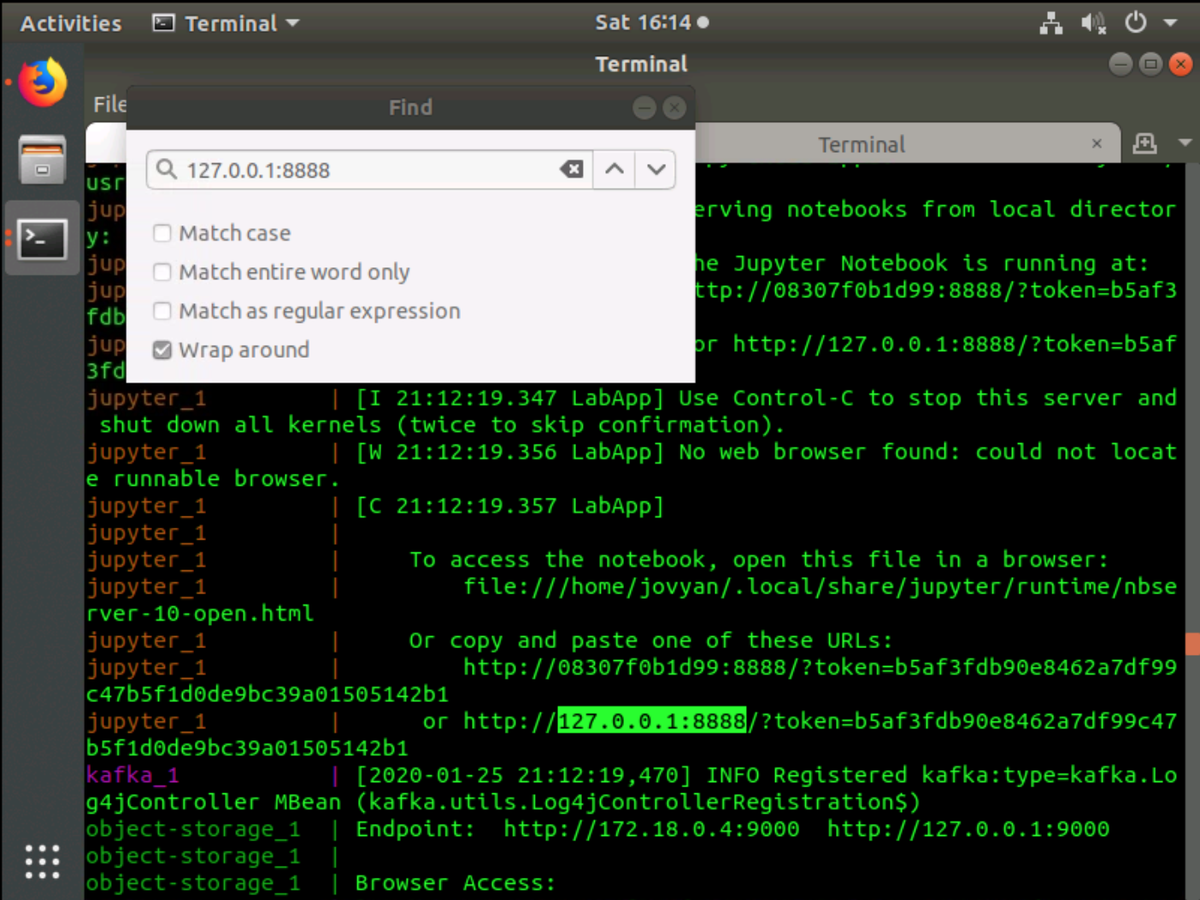
The complete Jupyter URL will look similar to the example below:
Copy the URL be selecting it in the terminal by pressing CTRL+SHIFT+C then paste it in a Firefox web browser. The UI will then present JupyterLab.

4. Accessing MinIO Storage
In the JupyterLab launcher section, navigate to Console Python 3 and click on the icon to view the in-browser terminal.
You can type in env and press enter to view all of the environment variables.
Of these variables, the MinIO object storage access and password keys are present.
In the JupyterLab terminal, type the following command to view the MinIO variables:
env | grep OBJECTS
Note: the output of "secret" variables may be hidden by some systems. You
can find a copy of the Jupyter configuration in the
Analytics
manifest file (analytics.yaml or analytics-gpu.yaml) in the infrastructure repository.
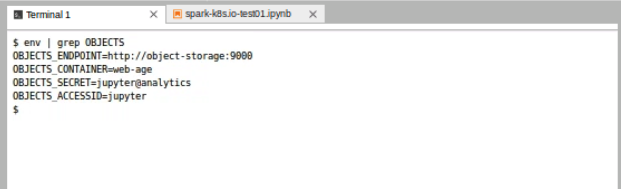
The OBJECTS_ENDPOINT URL can be used alongside the ACCESSID and SECRET to retrieve data from Jupyter. Several of the example notebooks show how these can be used from within Spark or utilizing a library like boto3.
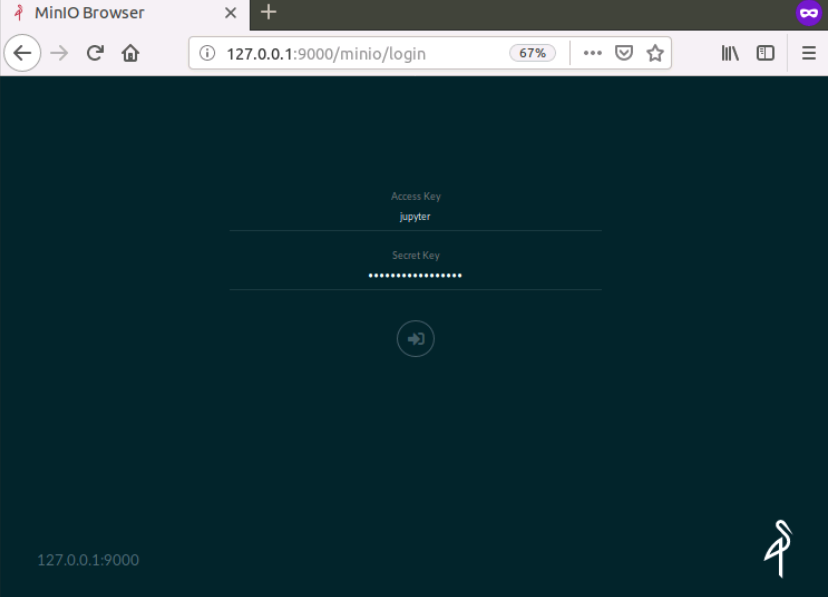
You can access the MinIO storage UI from port 9000
of your localhost `http://127.0.0.1:9000. The username and password
will be the ACCESSID and SECRET defined in the Jupyter environment.
Comments
Loading
No results found